Saturday morning hacks: Building an Analytics App with Flask

A couple years back I wrote about building an Analytics service with Cassandra. As fun as that project was to build, the reality was that Cassandra was completely unsuitable for my actual needs, so I decided to switch to something simpler. I'm happy to say the replacement app has been running without a hitch for the past 5 months taking up only about 20 MB of RAM! In this post I'll show how to build a lightweight Analytics service using Flask.
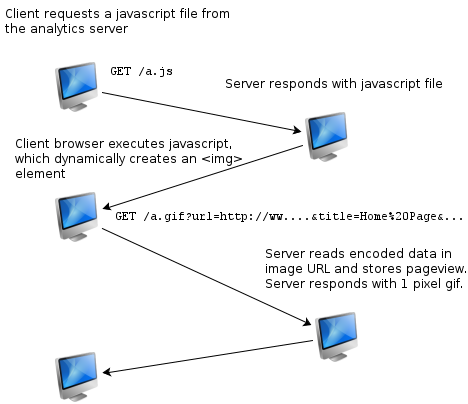
Analytics request/response cycle
The analytics service we'll be building will follow a blueprint popularized by Google Analytics. Here's how it works:
- Each page we wish to track will include a
<script>tag referencing a JavaScript file served by our analytics app (placed in your base template, for example). - Someone visits your site and their browser executes the JavaScript file.
- The JavaScript contains code to read the current page's title, URL, as well as other interesting metadata.
- Now the cool part, the script will dynamically create a new
<img>element, specifying as it'ssrca URL served by our analytic's app. - The page metadata we collected is encoded in the querystring of the new image's
srcattribute, which is in turn parsed by our analytics server. - The analytics server adds a new row to the database and returns a 1-pixel gif.
Here is a diagram of the requests and responses:
Design considerations
Since this is running on a VPS with limited resources, and because my blog doesn't really receive that much traffic, we'll go with something lightweight and functional. I like the Flask framework for projects of all sizes, but it should work really well for this particular app. We'll also use peewee ORM for storing the page-views and, later in this post, running queries against our analytics data. All told our app will be less than 100 lines of code including comments!
Relational Database
In order to be able to easily run lots of ad-hoc queries, we'll use a relational database to store the page-view data. I chose to use SQLite because it is a lightweight embedded database, and won't take up too much RAM. If you're already running Postgresql or MySQL, then feel free to use them instead.
WSGI Server
There are a lot of options to choose from, but my preference is to use gevent. Gevent is a coroutine-based networking library that mixes lightweight threads (greenlets) with libev's event loop. Through the use of some pretty deep monkey-patching, gevent turns your normal, blocking python code into non-blocking without any special syntax or APIs (just one big monkeypatch). Gevent's WSGI server, while pretty basic, provides solid performance with very low overhead. As with the database, if you're already running something else or are familiar with a different library, feel free to use that instead.
Creating the virtualenv
Begin by creating a new virtualenv for the analytics app and installing flask and peewee (and optionally, gevent):
$ virtualenv analytics
New python executable in analytics/bin/python2
Also creating executable in analytics/bin/python
Installing setuptools, pip...done.

$ cd analytics/
$ source bin/activate
$ pip install flask peewee
...
...
Successfully installed flask peewee Werkzeug Jinja2 itsdangerous markupsafe
Cleaning up...

$ pip install gevent  #  Optional.
Implementing the Flask App
Let's start by creating the skeleton of our Flask app. As discussed, there will be two views: one to serve the JavaScript file, and one to serve the 1-pixel GIF. In the analytics directory, create a new file analytics.py and add the following lines of code. This code specifies the boilerplate for our application as well as some configuration values:
from base64 import b64decode
import datetime
import json
import os
from urlparse import parse_qsl, urlparse

from flask import Flask, Response, abort, request
from peewee import *


# 1 pixel GIF, base64-encoded.
BEACON = b64decode('R0lGODlhAQABAIAAANvf7wAAACH5BAEAAAAALAAAAAABAAEAAAICRAEAOw==')

# Store the database file in the app directory.
APP_DIR = os.path.dirname(__file__)
DATABASE_NAME = os.path.join(APP_DIR, 'analytics.db')
DOMAIN = 'http://127.0.0.1:5000'  # TODO: change me.

# Simple JavaScript which will be included and executed on the client-side.
JAVASCRIPT = '' # TODO: add javascript implementation.

# Flask application settings.
DEBUG = bool(os.environ.get('DEBUG'))
SECRET_KEY = 'secret - change me'  # TODO: change me.

app = Flask(__name__)
app.config.from_object(__name__)

database = SqliteDatabase(DATABASE_NAME, pragmas={
    'journal_mode': 'wal',  # WAL-mode for better concurrent access.
    'cache_size': -32000})  # 32MB page cache.

class PageView(Model):
    # TODO: add model definition.

    class Meta:
        database = database

@app.route('/a.gif')
def analyze():
    # TODO: implement 1pixel gif view.

@app.route('/a.js')
def script():
    # TODO: implement javascript view.

@app.errorhandler(404)
def not_found(e):
    return Response('Not found.')

if __name__ == '__main__':
    database.create_tables([PageView], safe=True)
    app.run()
As you can see we have two simple views: one to serve the JavaScript, and one to analyze the data sent back from the visitor's browser and serve a 1-pixel GIF.
Getting information from the Browser
Let's begin with the JavaScript that will run on the client-side. This code will extract some basic information from the page:
- The URL of the page, including the querystring parameters (
document.location.href). - The page's title (
document.title). - The referring page's URL, if it exists (
document.referrer).
There are other attributes we could also extract, which you can add if you're interested, such as:
- The cookie key/value pairs (
document.cookie). - The last-modified date of the document (
document.lastModified). - And more.
After extracting the information, we will pass it to the analyze view in the query-string. For simplicity, we will have the JavaScript execute immediately once it is loaded by the visitor's browser, so we will wrap everything in a self-invoking anonymous function. Finally, we will use the browser's encodeURIComponent function to make values safe for passing through the query-string:
(function() {
  var img = new Image,
      url = encodeURIComponent(document.location.href),
      title = encodeURIComponent(document.title),
      ref = encodeURIComponent(document.referrer);
  img.src = '%s/a.gif?url=' + url + '&t=' + title + '&ref=' + ref;
})();
We've left a placeholder using the Python string interpolation parameter %s to allow our app to pass in the DOMAIN configuration value.
Replace the JAVASCRIPT configuration value in your application file with the following "minified" version of the above JavaScript code:
# Simple JavaScript which will be included and executed on the client-side.
JAVASCRIPT = """(function(){
    var d=document,i=new Image,e=encodeURIComponent;
    i.src='%s/a.gif?url='+e(d.location.href)+'&ref='+e(d.referrer)+'&t='+e(d.title);
    })()""".replace('\n', '')
We can now fill in the script view to serve our javascript file:
@app.route('/a.js')
def script():
    return Response(
        app.config['JAVASCRIPT'] % (app.config['DOMAIN']),
        mimetype='text/javascript')
Storing the page-view data
The script we wrote will send three values to the analyze view, containing the page's URL, title, and referring page. We can now fill in the PageView model definition to store this data.
On the server-side, we will also be able to access the visitor's IP address and the request headers sent by the visitor's browser, so we will add columns for those values as well as the timestamp indicating when the request was made.
Since each browser may send a different collection of headers, and each page may have a different set of querystring parameters, we will store these as JSON in a TextField. If you're using Postgresql, you could also use HStore or the native JSON data-type.
Here is the definition of the PageView model, along with a simple JSONField suitable for storing the query-string parameters and request headers:
class JSONField(TextField):
    """Store JSON data in a TextField."""
    def python_value(self, value):
        if value is not None:
            return json.loads(value)

    def db_value(self, value):
        if value is not None:
            return json.dumps(value)

class PageView(Model):
    domain = CharField()
    url = TextField()
    timestamp = DateTimeField(default=datetime.datetime.now, index=True)
    title = TextField(default='')
    ip = CharField(default='')
    referrer = TextField(default='')
    headers = JSONField()
    params = JSONField()

    class Meta:
        database = database
Now we can add a method to the PageView model which will extract all the relevant values from the request. The urlparse module contains helpful functions for extracting portions of the request, and we will use this to extract the visitor's URL and the querystring parameters:
class PageView(Model):
    # ... field definitions ...

    @classmethod
    def create_from_request(cls):
        parsed = urlparse(request.args['url'])
        params = dict(parse_qsl(parsed.query))

        return PageView.create(
            domain=parsed.netloc,
            url=parsed.path,
            title=request.args.get('t') or '',
            ip=request.headers.get('X-Forwarded-For', request.remote_addr),
            referrer=request.args.get('ref') or '',
            headers=dict(request.headers),
            params=params)
The final step will be to fill in the analyze view. This view will create a new PageView and return a 1-pixel GIF. As a safeguard, we will check for the presence of a URL in the querystring to ensure we don't accidentally create blank rows:
@app.route('/a.gif')
def analyze():
    if not request.args.get('url'):
        abort(404)

    with database.transaction():
        PageView.create_from_request()

    response = Response(app.config['BEACON'], mimetype='image/gif')
    response.headers['Cache-Control'] = 'private, no-cache'
    return response
Running the app
If you'd like to test out the app at this point, you can run it in debug mode by specifying DEBUG=1 on the command-line:
(analytics) $ DEBUG=1 python analytics.py
 * Running on http://127.0.0.1:5000/ (Press CTRL+C to quit)
 * Restarting with reloader
You can view the javascript by loading http://127.0.0.1:5000/a.js . If you have another web-app running locally, you can add the following tag to one of the pages to test the analytics app:
<script src="http://127.0.0.1:5000/a.js" type="text/javascript"></script>
To deploy the app to a product environment, I'd suggest looking into using a dedicated WSGI server. I like using gevent because it is extremely lightweight and provides great performance. You can modify analytics.py to serve requests using gevent instead of the Flask server. The following code will run the analytics app on port 5000 using gevent:
if __name__ == '__main__':
   from gevent.wsgi import WSGIServer
   WSGIServer(('', 5000), app).serve_forever()
Because gevent uses monkey-patching to achieve it's high concurrency, it is necessary to add the following line to the very top of the analytics.py file:
from gevent import monkey; monkey.patch_all()
Querying the Data
The real fun begins after you've started to collect data for a couple days and can run queries on it. In this section we'll look at some interesting ways we can query the data collected by the analytics app.
Using data from my blog, we'll run some queries on the past seven days of traffic:
>>> from analytics import *
>>> import datetime
>>> week_ago = datetime.date.today() - datetime.timedelta(days=7)
>>> base = PageView.select().where(PageView.timestamp >= week_ago)
First off, let's see how many page-views I got during the past week:
>>> base.count()
1133
How many different IPs visited my site?
>>> base.select(PageView.ip).group_by(PageView.ip).count()
850
What are the top 10 pages?
print (base
       .select(PageView.title, fn.Count(PageView.id))
       .group_by(PageView.title)
       .order_by(fn.Count(PageView.id).desc())
       .tuples())[:10]

# Prints...
[('Postgresql HStore, JSON data-type and Arrays with Peewee ORM',
  88),
 ("Describing Relationships: Django's ManyToMany Through",
  73),
 ('Using python and k-means to find the dominant colors in images',
  66),
 ('SQLite: Small. Fast. Reliable. Choose any three.', 58),
 ('Using python to generate awesome linux desktop themes',
  54),
 ("Don't sweat the small stuff - use flask blueprints", 51),
 ('Using SQLite Full-Text Search with Python', 48),
 ('Home', 47),
 ('Blog Entries', 46),
 ('Django Patterns: Model Inheritance', 44)]
During what four hour period of the day do I receive the most traffic?
hour = fn.date_part('hour', PageView.timestamp) / 4
id_count = fn.Count(PageView.id)
print (base
       .select(hour, id_count)
       .group_by(hour)
       .order_by(id_count.desc())
       .tuples())[:]
[(3, 208),
 (2, 201),
 (0, 194),
 (1, 183),
 (4, 178),
 (5, 169)]
Based on these numbers, it looks like I get most of my traffic mid-day around lunch-time, and the least amount of traffic in the late evening before midnight, but overall traffic is fairly even.
What are some of the most popular user-agents?
from collections import Counter
c = Counter(pv.headers.get('User-Agent') for pv in base)
print c.most_common(5)
[(u'Mozilla/5.0 (Windows NT 6.1; WOW64) AppleWebKit/537.36 (KHTML, like Gecko) Chrome/37.0.2062.120 Safari/537.36',
  81),
 (u'Mozilla/5.0 (X11; Linux x86_64) AppleWebKit/537.36 (KHTML, like Gecko) Chrome/37.0.2062.120 Safari/537.36',
  70),
 (u'Mozilla/5.0 (X11; Ubuntu; Linux x86_64; rv:32.0) Gecko/20100101 Firefox/32.0',
  50),
 (u'Mozilla/5.0 (Macintosh; Intel Mac OS X 10_9_4) AppleWebKit/537.78.2 (KHTML, like Gecko) Version/7.0.6 Safari/537.78.2',
  37),
 (u'Mozilla/5.0 (Windows NT 6.1; WOW64; rv:32.0) Gecko/20100101 Firefox/32.0',
  37)]
It's basically up to you what you want to do with the data. One fun query will generate a list of all the pages, in order, that were visited by a particular IP address. This can shed some light on how people browse your site from page-to-page:
inner = base.select(PageView.ip, PageView.url).order_by(PageView.timestamp)
query = (PageView
         .select(PageView.ip, fn.GROUP_CONCAT(PageView.url).alias('urls'))
         .from_(inner.alias('t1'))
         .group_by(PageView.ip)
         .order_by(fn.Count(PageView.url).desc())
print {pv.ip: pv.urls.split(',') for pv in query[:10]}

# Prints something like the following:
{
  u'xxx.xxx.xxx.xxx': [
    u'/blog/peewee-was-baroque-so-i-rewrote-it/',
    u'/blog/peewee-was-baroque-so-i-rewrote-it/',
    u'/blog/',
    u'/blog/postgresql-hstore-json-data-type-and-arrays-with-peewee-orm/',
    u'/blog/search/',
    u'/blog/the-search-for-the-missing-link-what-lies-between-sql-and-django-s-orm-/',
    u'/blog/how-do-you-use-peewee-/'],
  u'xxx.xxx.xxx.xxx': [
    u'/blog/dont-sweat-small-stuff-use-flask-blueprints/',
    u'/',
    u'/blog/',
    u'/blog/migrating-to-sqlite/',
    u'/blog/',
    u'/blog/saturday-morning-hacks-revisiting-the-notes-app/'],
  u'xxx.xxx.xxx.xxx': [
    u'/blog/using-python-to-generate-awesome-linux-desktop-themes/',
    u'/',
    u'/blog/',
    u'/blog/customizing-google-chrome-s-new-tab-page/',
    u'/blog/-wallfix-using-python-to-set-my-wallpaper/',
    u'/blog/simple-botnet-written-python/'],
  # etc...
}
Ideas for improving the app
- Build a web interface or API for querying the pageview data-set.
- Normalize the request headers using either a join table or something like Postgresql HStore (or JSONB if you're using 9.4).
- Collect user cookies and track users between visits.
- Use a GeoIP tool to identify users' locations based on their IP.
- Implement canvas fingerprinting to better identify unique visitors.
- Write more cool queries to extract data about your audience!
Thanks for reading
Thanks for taking the time to read this post, I hope you found it interesting! Feel free to leave a comment below or contact me if you have any questions.
You can find the source code for the analytics app and the "reports" hosted in this GitHub gist.
Links
- Some tips for speeding up SQLite.
- Building an analytics service with Flask and Cassandra.
- Using flask to build three small projects: a bookmarking service, a pastebin, and a wiki
If you enjoyed this post and are looking for more projects like this, check out the list of saturday-morning hack posts.
Comments (5)
Hendra | oct 04 2014, at 01:34pm
Awesome read. Really got me into the weekend morning hacks mood.
A quick question, why make the GET request via the img element instead of just calling it directly via ajax call on the js?
Mark | oct 02 2014, at 09:18pm
Very informative post.
Charles | oct 02 2014, at 02:48pm
Thanks so much for the kind words, Marko. I really like the simplicity and low-overhead of using gevent. I also use gevent for non-blocking I/O, so since I'm already using it I might as well use it for my server. I have a single-core server to serve my sites, so there's no real need for me to go with something bigger. I don't have a lot of experience with CherryPy but I hear it's pretty fantastic, so you should be fine either way.
Marko | oct 02 2014, at 02:43pm
As always it is a great pleasure to read your simple yet awesome and effective code. The implementation is great and I'm thinking about reusing some of it for a mobile flask-based geolocation app. What got me thinking was your decision to use gevent to serve the flask app. I am working on a small-to-medium office app in flask and I thought of deploying it (on windows) with the cherrypy wrapper. Do you think gevent is a better solution?
Commenting has been closed.
Charles | oct 04 2014, at 01:37pm
Thanks Hendra, I'm actually hacking right now on some improvements to the analytics app (including a nice little dashboard)!
The reason the
<img>tag is used is because typically you cannot make cross-domain Ajax requests. I run my analytics service on a different domain, and I also use the analytics service to collect data for multiple sites, so Ajax wasn't an option for me.