Saturday morning hack: a little note-taking app with Flask

Follow-up post
I wrote a follow-up post containing numerous improvements to the notes app, so after you've finished reading this one definitely check out Saturday morning hacks: Revisiting the notes app.
A couple Saturdays ago I spent the morning hacking together a note-taking app. I'm really pleased with the result, so I thought I'd share the code in case anyone else might find it useful.
The note-taking project idea came about out of necessity -- I wanted something that worked well from my phone. While I have a personal wiki site I've used for things like software installation notes or salsa recipes, I've also noticed that because it's so cumbersome to use from my phone, I often end up emailing things to myself. Plus a wiki implies a kind of permanence to the content, making it not a great fit for these impromptu notes. I also like to use markdown to format notes, but markdown isn't too easy on a phone because of the special characters or the need to indent blocks of text. With these considerations in mind, I set out to build a note-taking app that would be easy to use from my phone.
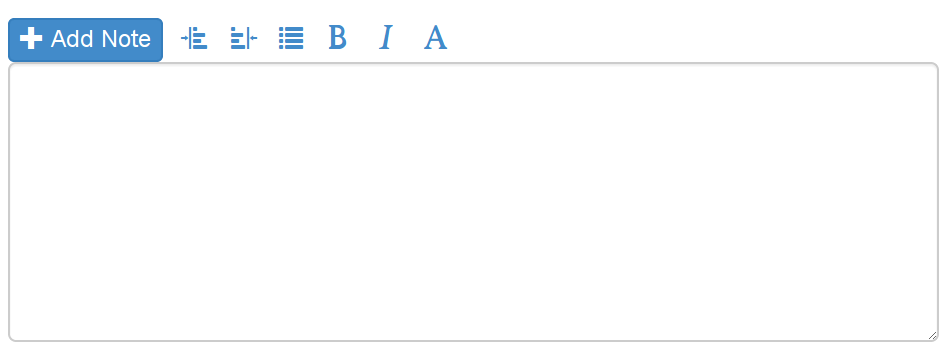
Here is how the app appears on a narrow screen like my phone:

And here it is on my laptop:
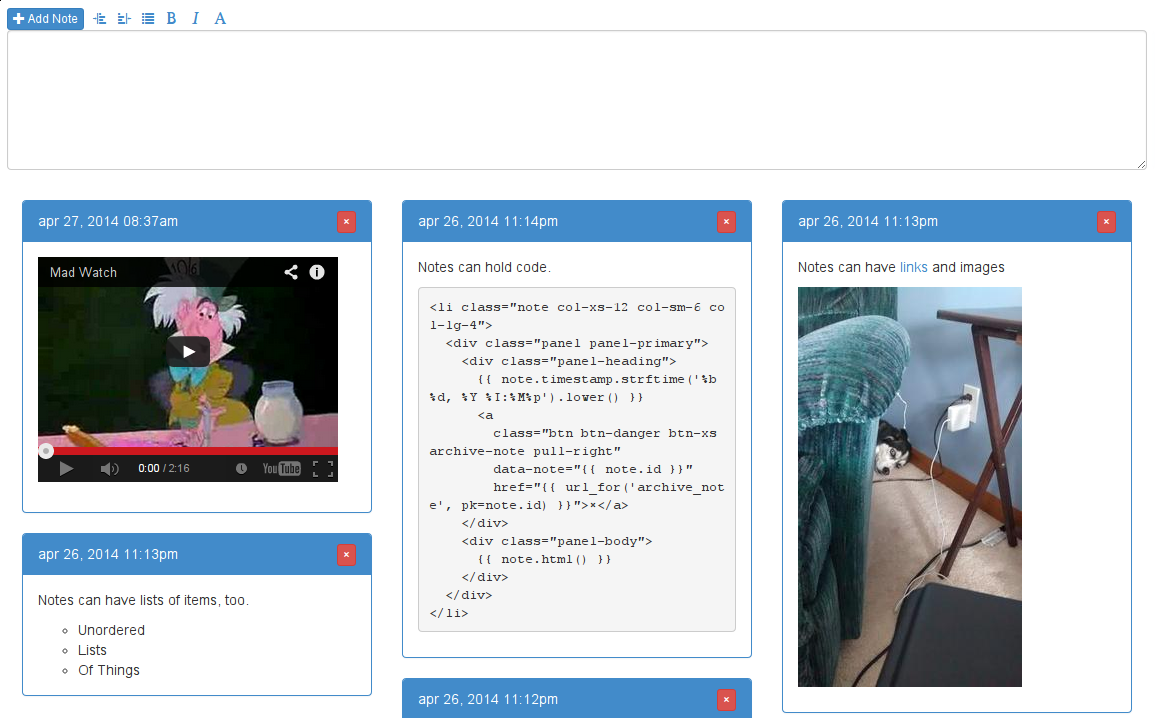
Because markdown is a bit difficult to use when you're not in a nice text editor like vim, I've added some simple toolbar buttons to the editor:
If you'd just like to see the code, here is the multi-file gist. The rest of this post will describe the code and how to build your own notes app.
Feature review
Based on the problems I outlined, the notes app needed to have to following features:
- Usable from phone or computer, with greater emphasis on phone.
- Aggregate notes in a single place I can access anywhere.
- Support markdown and make it easy to use on phone.
- Convert youtube links into video players, etc (using OEmbed).
I also wanted to avoid full-page refreshes when adding or deleting notes, so the app needs to use ajax. And of course I wanted it to look kind of like pinterest.
The tools
On the frontend, the first choice I made was to use Bootstrap. Twitter Bootstrap provides a very usable set of defaults that work well on a variety of screen sizes. Plus Bootstrap comes with a bunch of other goodies like various widgets and icons. Because the Bootstrap JavaScript libraries use jQuery, I used that for the Ajax and other DOM manipulation code.
For the backend code I went with Flask, since I'm familiar with it and foresaw being able to get something working quickly. I planned on storing the notes in a SQL database, so I used my own project peewee for the database code. I used another of my own projects, micawber, for the OEmbed integration. If you're not familiar with OEmbed, the idea is that you feed some service a URL and in return you get a video player (or some other appropriate widget).
Setting it up
I started with a virtualenv and a directory named app, then proceeded to install
flask, peewee, micawber, BeautifulSoup and markdown:
$ virtualenv notes
$ cd notes/
$ source bin/activate
(notes) $ mkdir app
(notes) $ cd app
(notes) $ pip install flask peewee micawber beautifulsoup markdown
Python code
The first module I like to start with is the app module, which contains just the WSGI app and any
other "singleton"-type objects, like the database manager. In the app module I'm just
creating my Flask app and instantiating a peewee database. I like SQLite a lot so that's
what I'm using for the db.
# app.py
import os

from flask import Flask
from micawber import bootstrap_basic
from peewee import SqliteDatabase

APP_ROOT = os.path.dirname(os.path.realpath(__file__))
DATABASE = os.path.join(APP_ROOT, 'notes.db')
DEBUG = False

app = Flask(__name__)
app.config.from_object(__name__)
db = SqliteDatabase(app.config['DATABASE'], pragmas=[('journal_mode', 'wal')])
oembed = bootstrap_basic()
The next thing I did was to declare my database model, a single table which will hold the various "notes". I figured all that I needed was a text field, but I also wanted to store when the note was created (for informational purposes and to allow sorting things newest-to-oldest). I also like the idea of being able to "archive" a note, effectively deleting it from the visible list of notes, but leaving its row intact in the database for future archaelogical expeditions.
The model class below has a couple convenience methods. The first, html() simply runs
the content through markdown, converts links into objects where possible, and returns the HTML code. The second, public() returns a query representing
the notes I want to see displayed when I pull up the page.
# models.py
import datetime

from flask import Markup
from markdown import markdown
from micawber import parse_html
from peewee import *

from app import db, oembed

class Note(Model):
    content = TextField()
    timestamp = DateTimeField(default=datetime.datetime.now)
    archived = BooleanField(default=False)

    class Meta:
        database = db

    def html(self):
        html = parse_html(
            markdown(self.content),
            oembed,
            maxwidth=300,
            urlize_all=True)
        return Markup(html)

    @classmethod
    def public(cls):
        return (Note
                .select()
                .where(Note.archived == False)
                .order_by(Note.timestamp.desc()))
Lastly come the view functions, of which there are two: a view for displaying the list of notes and creating new ones, and a view for archiving notes. This was as much for simplicity as anything else. I also skimped on pagination and just limit the notes query to the most recent 50. Here is how the views module looks:
# views.py
from flask import abort, jsonify, render_template, request

from app import app
from models import Note

@app.route('/', methods=['GET', 'POST'])
def homepage():
    if request.method == 'POST':
        if request.form.get('content'):
            # Create a new note in the db.
            note = Note.create(content=request.form['content'])

            # Render a single note panel and return the HTML.
            rendered = render_template('note.html', note=note)
            return jsonify({'note': rendered, 'success': True})

        # If there's no content, indicate a failure.
        return jsonify({'success': False})

    notes = Note.public().limit(50)
    return render_template('homepage.html', notes=notes)

@app.route('/archive/<int:pk>/', methods=['POST'])
def archive_note(pk):
    try:
        note = Note.get(Note.id == pk)
    except Note.DoesNotExist:
        abort(404)
    note.archived = True
    note.save()
    return jsonify({'success': True})
So far there's been nothing remarkable in this code -- in fact I've cut a lot of corners. But since this was a Saturday morning hack, I think that's OK!
To tie together our 3 python modules (app.py, models.py and views.py) I like to create a single entry-point named main.py. Flask relies on import-time side-effects (for registering URL routes), so this is just something I've gotten used to doing. Here is how main.py looks:
# main.py
from app import app
from models import Note
import views

if __name__ == '__main__':
    Note.create_table(True)
    app.run()
The app will run if you execute main.py from the command-line, but without any templates or JavaScript to drive things around, it will be pretty sad so let's see how the templates look.
Templates
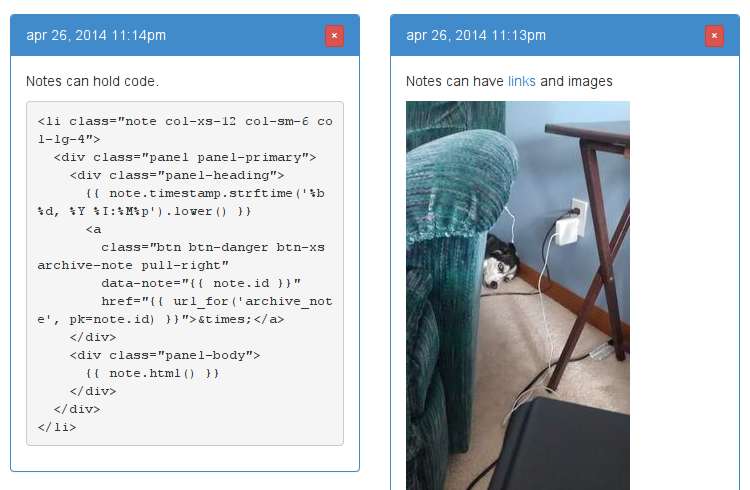
The good news is there are only two templates for this project: the template for the main page, and the partial template that represents a single note. I'm going to go a little bit out-of-order and show the shorter one first, which is the note partial. Each note is rendered in a list item tag and uses the bootstrap panel widget (that's how they appear in those nice little boxes). The col-xx-x classes tell the panel how much horizontal screen-space it should take up. Bootstrap uses a 12-column grid, so these classes translate to "On phones go all the way across, on small screens use half the width, and on large screens use one third." Also I'm calling the helper method note.html() to convert the note content from markdown into HTML:
{# templates/note.html #}
<li class="note col-xs-12 col-sm-6 col-lg-4">
<div class="panel panel-primary">
<div class="panel-heading">
{{ note.timestamp.strftime('%b %d, %Y %I:%M%p').lower() }}
<a
class="btn btn-danger btn-xs archive-note pull-right"
data-note="{{ note.id }}"
href="{{ url_for('archive_note', pk=note.id) }}">×</a>
</div>
<div class="panel-body">
{{ note.html() }}
</div>
</div>
</li>
This is what these widgets look like:
The next template is a bit larger but hopefully not so long as to be unreadable. Basically I'm just including a bunch of javascripts which will help lay out the note panels in a nice pinterest-style grid. There's a custom javascript, notes.js, which configures the editor and the event handlers.
{# homepage.html #}
<!DOCTYPE html>
<html lang="en">
  <head>
    <meta charset="utf-8">
    <meta http-equiv="X-UA-Compatible" content="IE=edge">
    <meta name="viewport" content="width=device-width, initial-scale=1">
    <title>Notes</title>
    <link href="{{ url_for('static', filename='css/bootstrap.min.css') }}" rel="stylesheet">
    <script src="{{ url_for('static', filename='js/jquery-1.11.0.min.js') }}"></script>
    <script src="{{ url_for('static', filename='js/bootstrap.min.js') }}"></script>
    <script src="{{ url_for('static', filename='js/imagesloaded.pkgd.min.js') }}"></script>
    <script src="{{ url_for('static', filename='js/masonry.pkgd.min.js') }}"></script>
    <script src="{{ url_for('static', filename='js/notes.js') }}"></script>
    <script type="text/javascript">
      $(function() {
        new Notes.Editor();
      });
    </script>
  </head>
  <body>
    <div class="container content">
      <div class="page-header">
        <h1>Notes</h1>
      </div>
      <form action="." class="form" id="note-form" method="post">
        <button class="btn btn-primary btn-xs" type="submit">
          <span class="glyphicon glyphicon-plus"></span> Add Note
        </button>
        <textarea class="form-control" id="content" name="content"></textarea>
      </form>
      <ul class="list-unstyled notes">
        {% for note in notes %}
          {% include "note.html" %}
        {% endfor %}
      </ul>
      <div style="clear:both;"></div>
    </div>
  </body>
</html>
Here are links to the various styles and scripts I've used:
- Bootstrap (zip)
- jQuery
- imagesloaded, fires an event when all the images on the page are loaded -- used by masonry.
- masonry, lays out the notes in a pinterest-style grid.
Notes.js, the missing link
The final piece is the notes javascript. Unfortunately there's a bit of code here -- most of it around setting up the little toolbar buttons for the markdown helpers. For that reason I'm going to go through the javascript in pieces.
First off, everything is wrapped in a self-evaluating anonymous function, so the skeleton of the script looks like this:
// notes.js
Notes = window.Notes || {};

(function(exports, $) {

   /*
    * All the following code lives in here.
    */

})(Notes, jQuery);
The javascript begins with the Editor object constructor. This constructor locates the important DOM elements and then sets up the various event handlers.
function Editor() {
  this.form = $('form#note-form');
  this.editor = $('textarea#content');
  this.container = $('ul.notes');
  this.initialize();
}

Editor.prototype.initialize = function() {
  this.setupMasonry();
  this.setupNotes();
  this.setupForm();
  this.editor.focus();
}
The first step in initialization is to set up the masonry plugin. We'll wait until all the images are loaded before calling masonry:
Editor.prototype.setupMasonry = function() {
  var self = this;
  imagesLoaded(this.container, function() {
    self.container.masonry({'itemSelector': '.note'});
  });
}
The next function, setupNotes is very minimal and is only responsible for binding an event handler to the close button in the corner of each note on display. When clicked this should trigger an Ajax request that archives the note, then removes it from the DOM. Here is the code for both setupNotes and the archiveNote event handler:
Editor.prototype.setupNotes = function() {
  var self = this;
  $('a.archive-note').on('click', this.archiveNote);
}

Editor.prototype.archiveNote = function(e) {
  e.preventDefault();
  var elem = $(this);
  var panel = elem.parents('.panel');
  var self = this;
  $.post(elem.attr('href'), function(data) {
    if (data.success) {
      panel.remove();
      $('ul.notes').masonry();
    }
  });
}
We then need to set up the notes form. I like using Ctrl+Enter on my laptop to trigger a form submission, so we'll need to add a keydown event handler. Then, since the form submit needs to happen via Ajax, we'll bind a handler to the form's submit event. Most importantly, we need to set up some helpers for working with markdown. Because they were easy to implement, I've only added a few toolbar buttons, but hopefully they will alleviate some of the pain in writing markdown from a phone keyboard. They are:
- Indent 4 spaces
- Dedent 4 characters
- Convert lines to an unordered list
- Bold
- Italics
- Select All
Here is the setupForm function:
Editor.prototype.setupForm = function() {
  var self = this;
  this.editor.on('keydown', function(e) {
    if (e.ctrlKey && e.keyCode == 13) {
      self.form.submit();
    }
  });
  this.form.submit(function(e) {
    e.preventDefault();
    self.addNote();
  });
  this.addMarkdownHelpers();
}
The addNote() function is responsible for submitting a note via Ajax, then adding the rendered content to the list of other notes in the DOM.
Editor.prototype.addNote = function() {
  var self = this;
  this.editor.css('color', '#464545');
  $.post(this.form.attr('target'), this.form.serialize(), function(data) {
    if (data.success) {
      self.editor.val('').focus();
      listElem = $(data.note);
      listElem.find('a.archive-note').on('click', self.archiveNote);
      self.container.prepend(listElem);
      self.container.masonry('prepended', listElem);
    } else {
      self.editor.css('color', '#dd1111');
    }
  });
}
The addMarkdownHelpers() function adds the toolbar buttons, specifying a callback that will operate on each line of selected text (or in the case of select all, the entire text):
Editor.prototype.addMarkdownHelpers = function() {
  var self = this;
  this.addHelper('indent-left', function(line) {
    return '    ' + line;
  });
  this.addHelper('indent-right', function(line) {
    return line.substring(4);
  });
  this.addHelper('list', function(line) {
    return '* ' + line;
  });
  this.addHelper('bold', function(line) {
    return '**' + line + '**';
  });
  this.addHelper('italic', function(line) {
    return '*' + line + '*';
  });
  this.addHelper('font', null, function() {
    self.editor.focus().select();
  });
}
The addHelper() function does all the dirty work of modifying the selected text. Here is the code for addHelper() and several other utility functions:
Editor.prototype.addHelper = function(iconClass, lineHandler, callBack) {
  var link = $('<a>', {'class': 'btn btn-xs'}),
      icon = $('<span>', {'class': 'glyphicon glyphicon-' + iconClass}),
      self = this;

  if (!callBack) {
    callBack = function() {
      self.modifySelection(lineHandler);
    }
  }

  link.on('click', function(e) {
    e.preventDefault();
    callBack();
  });
  link.append(icon);
  this.editor.before(link);
}

Editor.prototype.modifySelection = function(lineHandler) {
  var selection = this.getSelectedText();
  if (!selection) return;

  var lines = selection.split('\n'),
      result = [];
  for (var i = 0; i < lines.length; i++) {
    result.push(lineHandler(lines[i]));
  }

  this.editor.val(
    this.editor.val().split(selection).join(result.join('\n'))
  );
}

Editor.prototype.getSelectedText = function() {
  var textAreaDOM = this.editor[0];
  return this.editor.val().substring(
    textAreaDOM.selectionStart,
    textAreaDOM.selectionEnd);
}
If you're still with me, we're done! All that's left is to export the Editor constructor and save the file, never to look at it again.
exports.Editor = Editor;
If you'd like to double-check what you have, here is a link to all of this code contained in a multi-file gist.
Thanks for reading
Thanks for taking the time to read this post, I hope you found it interesting. I had fun putting this together and am looking forward to hacking on it for several more Saturdays. Here are some feature ideas:
- Search
- Pagination
- Bookmarklet that allows me to create a Note for any site I'm browsing and want to save.
If you have any neat ideas for improving this I'd be very interested in hearing them, so feel free to leave a comment below.
Update: there is a follow-up article titled revisiting the notes app in which we:
- Allow creation of Task Lists with checkbox inputs.
- Create reminders that will send me an email at the appointed time.
- Built a RESTful API to interact with the Note model. Thanks to flask-peewee everything comes "for free".
- Added search.
- Added pagination (using Ajax).
Here are the links to the other posts in the series:
- Part 2: Revisiting the note-taking app (adding todo lists, reminders, search, and a REST API)
- Part 3: Adding full-text search using SQLite's search engine extension
Or simply look at all of the saturday-morning hack posts.
Comments (5)
Shashank Sharma | may 01 2014, at 01:55pm
Thanks for sharing. I am just starting out with flask and this tutorial is perfect for me !
starenka | may 01 2014, at 11:40am
As for bookmarklet, if you use a browser which allows you to define your own shorcuts for search engines (as seen first in Opera yeeeeaaars ago), you just type the keyword in front the url and it will be send to you page (via GET or POST). I use this for years. Simple. Effective.
Charles Leifer | apr 28 2014, at 03:19pm
I'm a beginner with Python, but this gives me some really good ideas for my own app
That's great! Glad you enjoyed the post.
Aaron Crowder | apr 28 2014, at 02:42pm
This looks great. Really clean and simple. I'm a beginner with Python, but this gives me some really good ideas for my own app (not a note taking one).
Commenting has been closed.
Jeff | may 02 2014, at 01:58pm
Thanks for this, really inspiring!