Suffering for fashion: a glimpse into my Linux theming toolchain

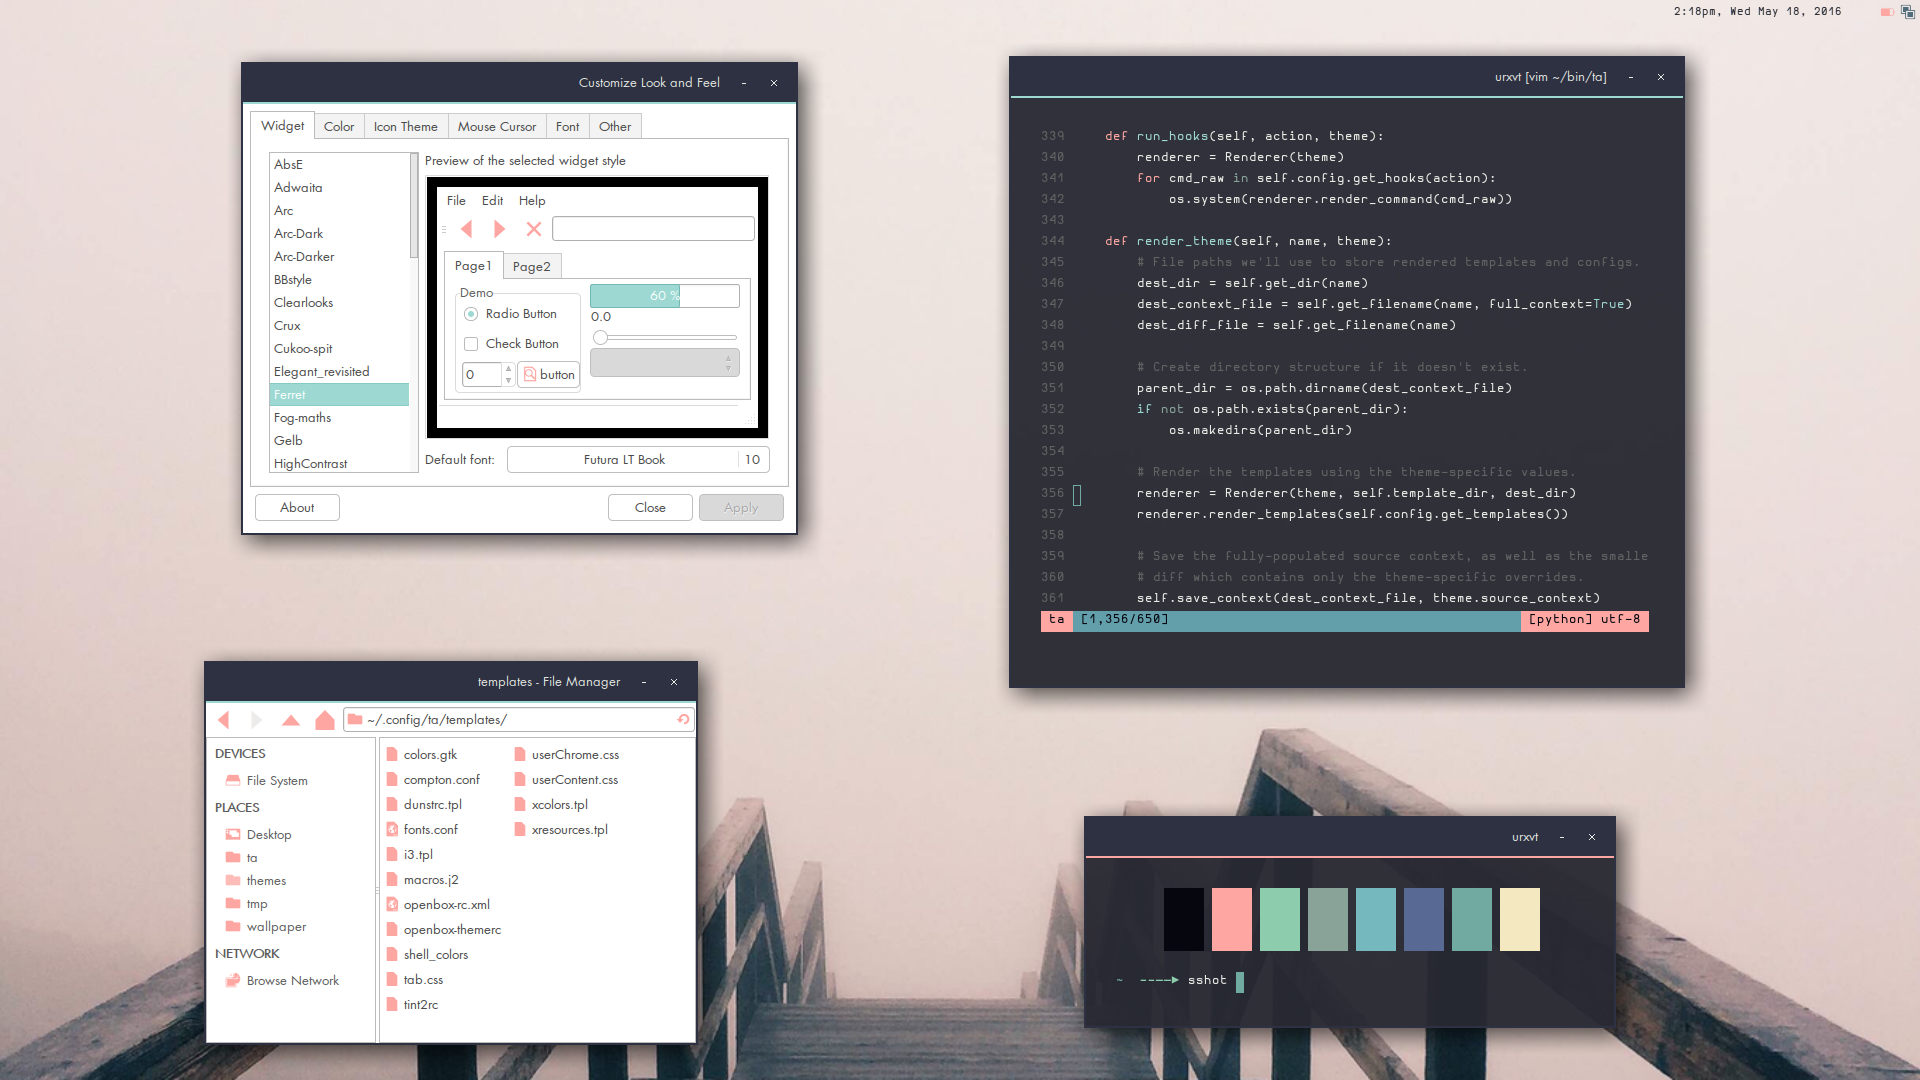
My desktop at the time of writing.
Here it is a couple months later. More pics.
It's been over 2 years since I wrote about the tooling I use to theme my desktop, so I thought I'd post about my current scripts. In the intervening time, my code for using k-means to extract colors from a wallpaper has been recycled by a handful of ricers. To be honest, though, I was never really satisfied with that approach.
k-means
k-means works by thinking of the colors in an image as points in a 3-dimensional space (RxGxB). We want to find k clusters of points, a cluster hopefully representing a group of similar pixels. k-means works by selecting k points and progressively refining their location until all k points stabilize at the center of a cluster of pixels.
The first problem is that the output is an approximation. For photographs this isn't an issue (1920x1080 ≅ 2M possible colors), but suppose you have an image consisting of four equally-sized, colored squares. k-means(4) would not necessarily return the actual color value of any one of those squares. This is because the algorithm works by finding the center, or average, of a cluster of points. If a cluster has pixels from two of the colored squares, our output will be off. Basically, it all depends on choosing good inputs.
The second problem is that it is slow, especially if you picked bad center points, and especially if you've chosen to implement it in Python (lazy). k-means definitely is useful, but given it's slowness and inconsistency, I found it to be a bit too unpredictable, at least the way I had chosen to implement it. For the interested, this paper (pdf) describes a number of ways to improve the performance of k-means for color quantization.
Stealing from others
I poked around on GitHub and found this repo, which does something rather clever. They lean on PIL(low) to do the color palette reduction (quantization). In the colorific implementation, PIL appears to be using the median cut algorithm (though other algorithms are available). This algorithm produces consistent results, faster. It also has the benefit of being implemented in C.
Here is how to reduce the palette using this method:
def isolate_colors(filename, ncolors):
    img = Image.open(filename)
    if img.mode != 'RGB':
        img = img.convert('RGB')
    img = img.convert('P', palette=Image.ADAPTIVE, colors=ncolors)
    img = img.convert('RGB')
    return sorted(img.getcolors(ncolors), reverse=True)
The above code takes a filename and number of colors, and returns a list of the pixel counts-to-RGB values in the reduced-color image.
Putting it together
Armed with this new information, I decided to use PIL's quantize functionality to isolate the various colors in an image. And, really, I could have stopped there, but I decided to press on...
The core of a color-scheme is the 16+2 colors that are used in the terminal. The 16 is subdivided into two sets of 8 colors, each consisting of a black, red, green, yellow, blue, magenta, cyan and white color. The additional two colors are the foreground and background. Here's an example:
What I wanted to do, and what I had not attempted in the previous version, was to try to pick colors from the image's reduced color palette that mapped nicely to the 16+2 distinct slots.
This process was actually pretty simple, though it took me a false start or two (tried mapping things to HSV and filtering by hue but that didn't work). What I settled on was creating a mapping of canonical colors for each of the 8 distinct slots. It's slightly more complicated than that because traditionally color 7 is light gray and 8 is dark gray, but I digress... So I have this list of canonical colors, black (0, 0, 0), red (255, 0, 0), cyan (0, 255, 255), etc. I then would iterate through the canonical colors, finding the image color that was nearest in terms of our 3-dimensional RGB space.
At this point I took a moment to reflect.
It still looked like shit
Despite having a palette of 50 colors available, the output looked very boring without enough variety. I did two things to remedy the situation.
The first thing I did was, after reducing the image palette to 50 colors, I used a distance heuristic to remove colors that were too similar. This gave me fewer colors to work with, but the resulting colors would be more representative of the distinct tones present in the image.
The second thing I did was try to output fewer duplicate colors. Instead of just picking the closest match, I put the colors into a heap and picked the 2nd closest color match if the best match had already been used (provided it fell within a certain maximum distance), same for the 3rd best, etc.
Here is the code to dedupe. The rollup parameter is the distance heuristic for merging two colors. The merge is pretty naive, it just favors the color with the most pixels.
# count_color is a sorted (desc) list of: [(pixel count, (r, g, b)), ...]
# rollup is the distance heuristic, arrived at by fiddling til it looked ok

def dedupe(count_color, rollup=10):
    result = {}
    for count, rgb in count_color:
        if rgb in result:
            result[rgb] += count
        else:
            for rrgb in result:
                dist = euclidean_dist(rrgb, rgb)
                if dist < rollup:
                    result[rrgb] += count
                    break
            else:
                result[rgb] = count

    return sorted([(count, color) for color, count in result.items()],
                  reverse=True)

def euclidean_dist(p1, p2):
    return math.sqrt(sum((p1[i] - p2[i]) ** 2 for i in range(3)))
Next let's see the code for matching palette colors to canonical colors. For reference, here's the example canonical color values I used:
canonical = [
    (0, 0, 0),  # Black
    (255, 0, 0),  # Red
    (0, 255, 0),  # Green
    (255, 255, 0),  # Yellow
    (0, 0, 255),  # Blue
    (255, 0, 255), # Magenta
    (0, 255, 255),  # Cyan
    (192, 192, 192),  # Light gray

    (64, 64, 64),  # Dark gray
    (255, 0, 0),  # Red
    (0, 255, 0),  # Green
    (255, 255, 0),  # Yellow
    (0, 0, 255),  # Blue
    (255, 0, 255), # Magenta
    (0, 255, 255),  # Cyan
    (255, 255, 255),  # White
]
This function iterates through the canonical colors and finds the best (least distance) match in the image palette. If the best match has already been used, though, we try to find a substitute by looking at the 2nd closest, 3rd closest, etc so long as they don't exceed a given distance from the original best match.
def get_xcolors(colors, substitution_distance=20):
    results = []
    for crgb in self.canonical:
        distances = []
        for rgb in colors:
            distance = euclidean_dist(crgb, rgb)
            heapq.heappush(distances, (distance, rgb))

        # First, try the closest RGB match.
        best = heapq.nsmallest(1, distances)[0][1]
        if best not in results:
            results.append(best)
        else:
            # Attempt to find a substitute.
            current = 0  # Distance from best color to potential substitute.
            min_dist = None
            vals = []
            while distances and current < substitution_distance:
                dist, rgb = heapq.heappop(distances)
                vals.append(rgb)

                # Here we're keeping an eye on the distance between
                # the potential substitute color, and the original
                # "best" color.
                if min_dist is None:
                    min_dist = dist
                else:
                    current = dist - min_dist

            for rgb in vals:
                if rgb not in results:
                    # We found a substitute that isn't in use.
                    results.append(rgb)
                    break
            else:
                # No substitute found, just use the best match.
                results.append(vals[0])

    return results
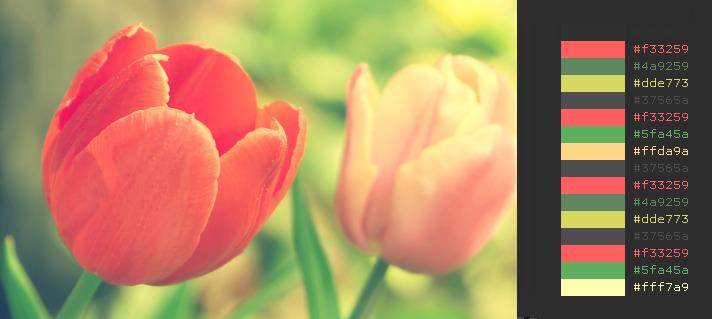
Things are looking better:
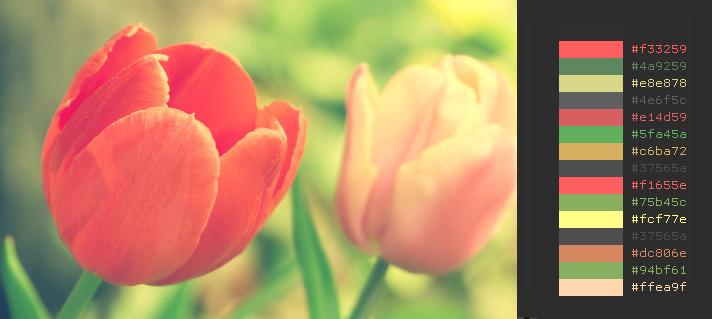
Normalizing values
I added a final post-processing step that ensured that the background and the terminal "black" color were dark enough, and the foreground and "white" color were bright enough. I did this by converting the color to HSV and reducing or increasing the V so that it fell within a certain range. The credit for this idea goes to a redditor named radiosilence.
import colorsys  # stdlib

def ensure_value(rgb, low, high):
    r, g, b = rgb
    h, s, v = colorsys.rgb_to_hsv(r / 256., g / 256., b / 256.)
    v = max(min(v, high), low)
    return tuple([i * 256. for i in colorsys.hsv_to_rgb(h, s, v)])

# Example, to ensure that black has a value between 0 and .2:
# fixed_black_rgb = ensure_value(black_rgb, 0.0, 0.2)
Examples
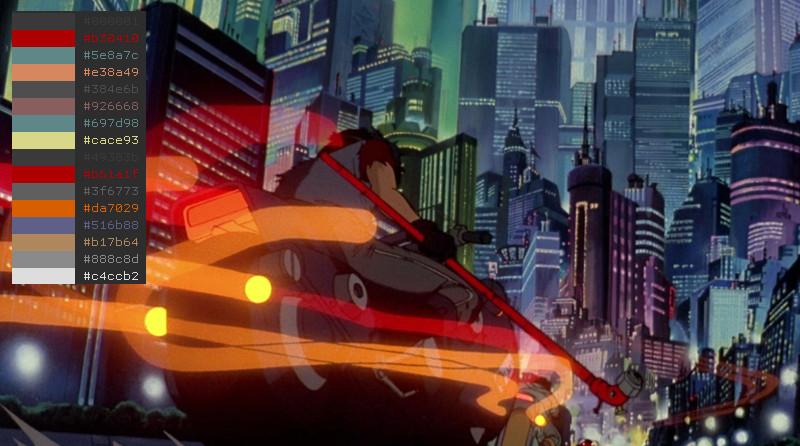
Back from the original k-means post, here's how the new method interprets Akira:
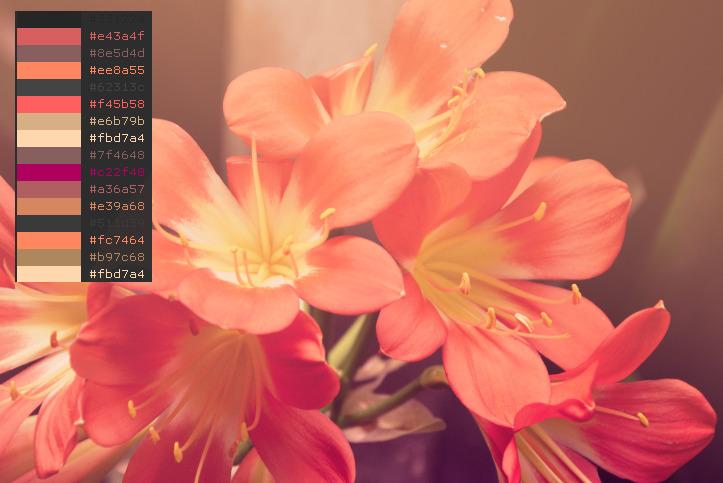
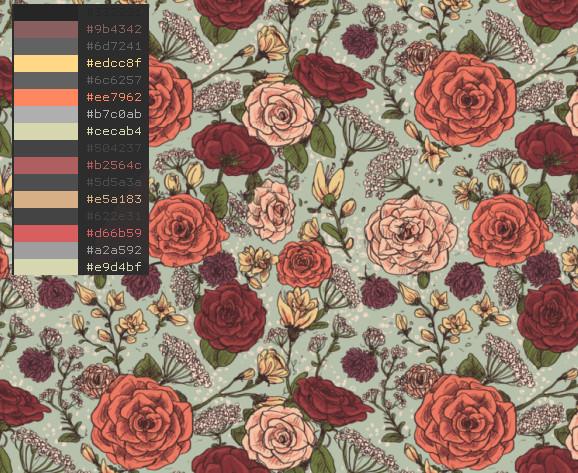
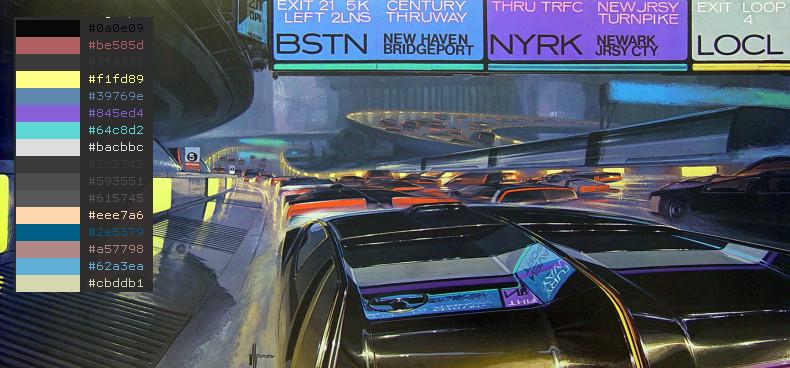
Here are some others from my wallpapers folder:


And that's how I'm currently generating color schemes from images. This is really just the first step in a literal pipeline of scripts that I use to get to an actual color scheme, but I thought it might be interesting to read about. The script I'm using to print those nice colored HEX representations in the terminal can be found here.
As to generating everything else, I pipe the output of the script described in this post to another script which converts the colors into an Xresources file. Then another script reads the Xresources file and the colors are used to render a set of templated-out config files (as well as update my SVG icon files, GTK theme, wallpaper...).
Now, put on your headphones and check out this awesome song by Of Montreal, Suffer for Fashion on YouTube.
Comments (2)
Ted | mar 25 2016, at 08:30pm
because traditionally color 7 is light gray and 8 is dark gray
When was that? 0 is black.
Commenting has been closed.
Francis Kim | mar 30 2016, at 09:20pm
Akira! Great post too :)