Using python to generate awesome linux desktop themes
I remember spending hours when I was younger cycling through the various awesome color themes on my 386, in the glory days of windows 3.1. Remember hotdog stand?
Well, I haven't changed much. I still enjoy making tweaks to the colors and appearance of my desktop. In this post I'll talk about a script I wrote that makes it easy for me to modify all the various colors and configuration files which control the appearance of my desktop.
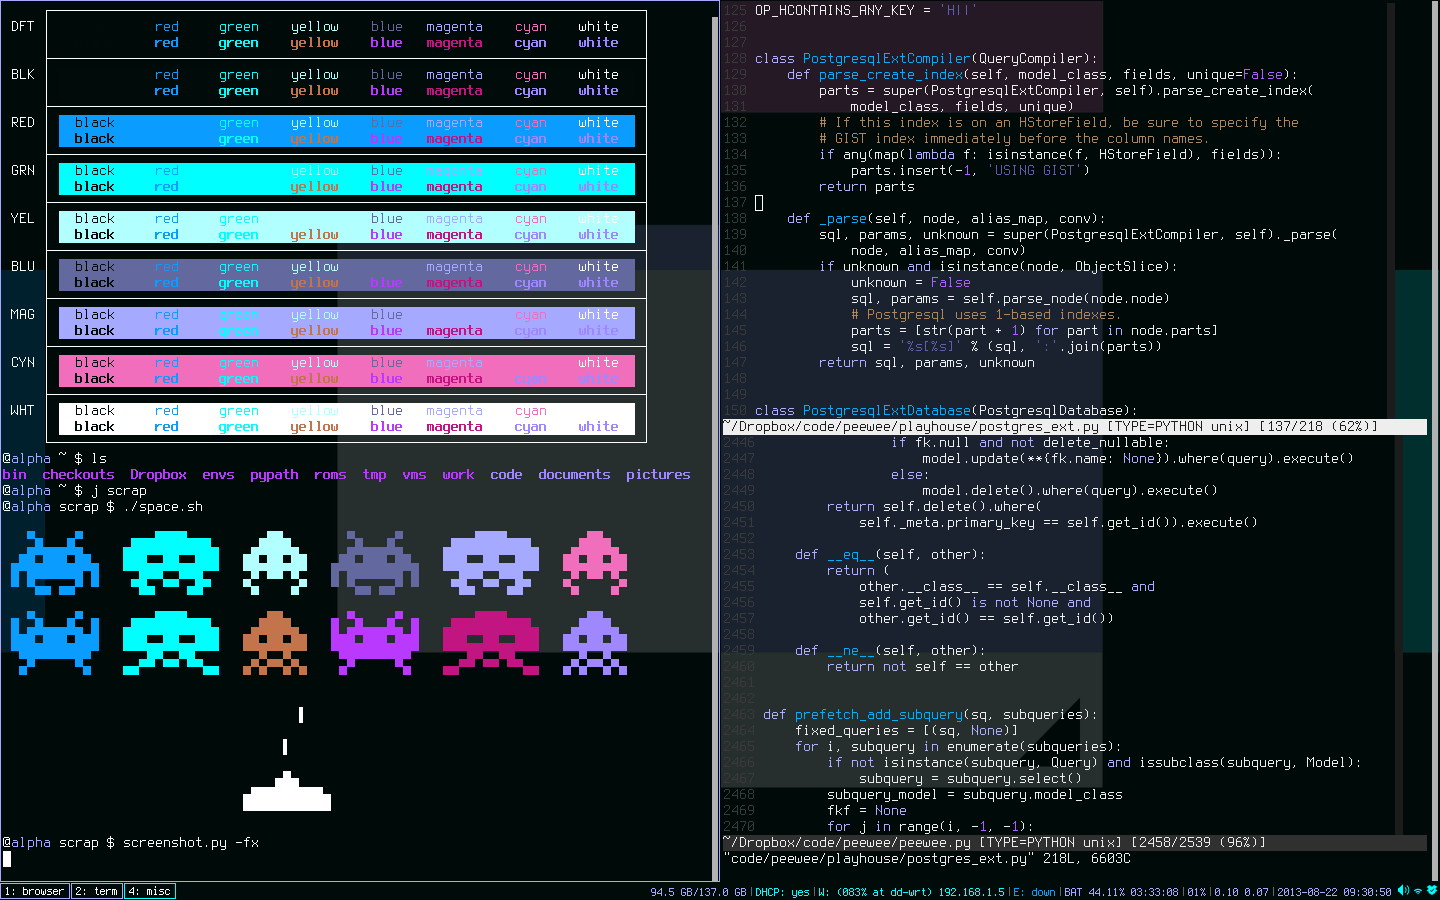
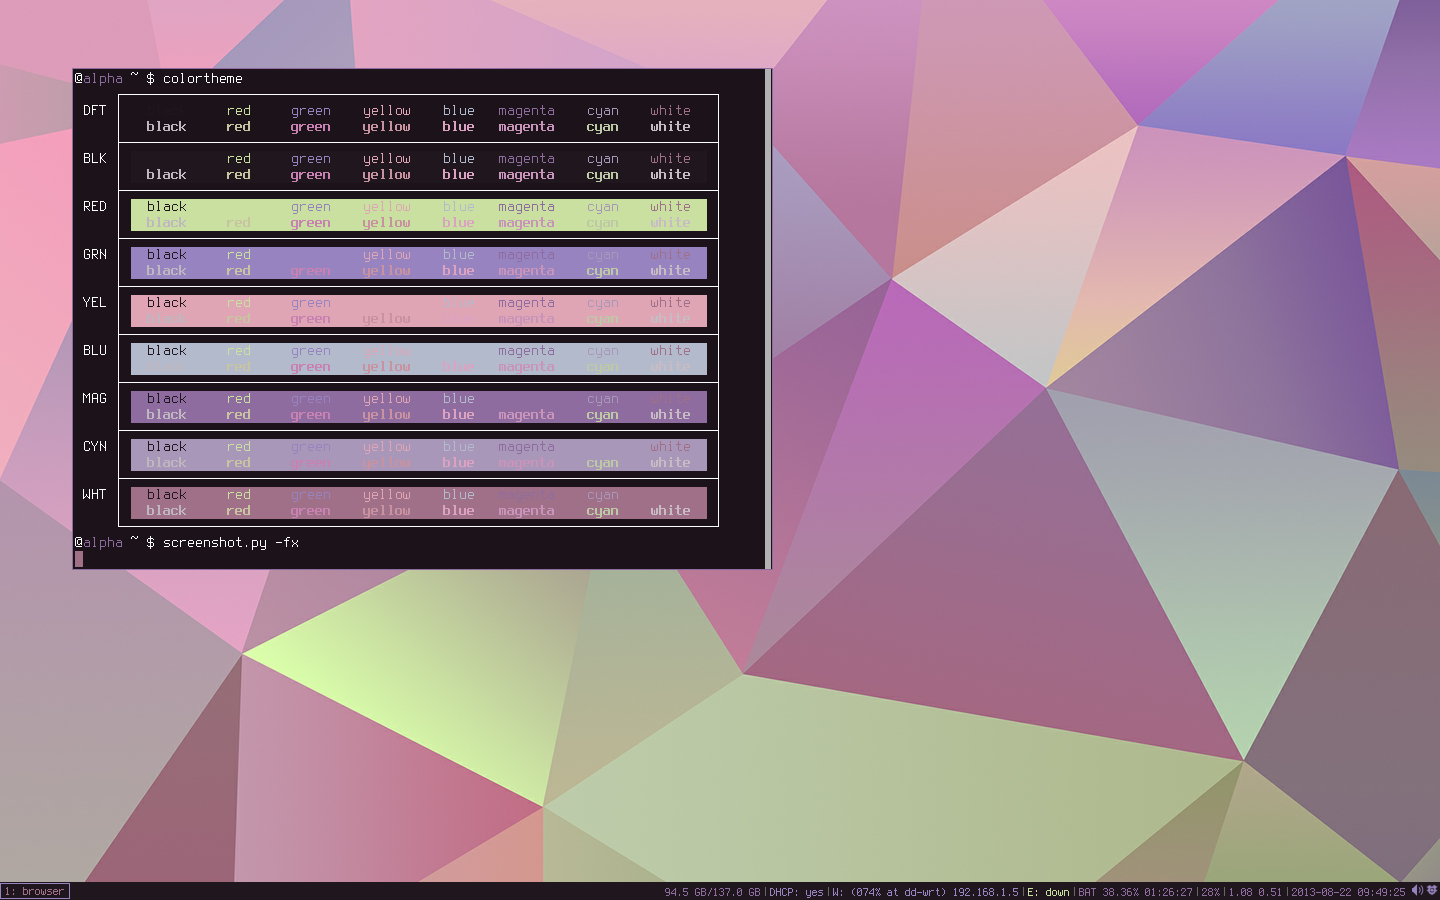
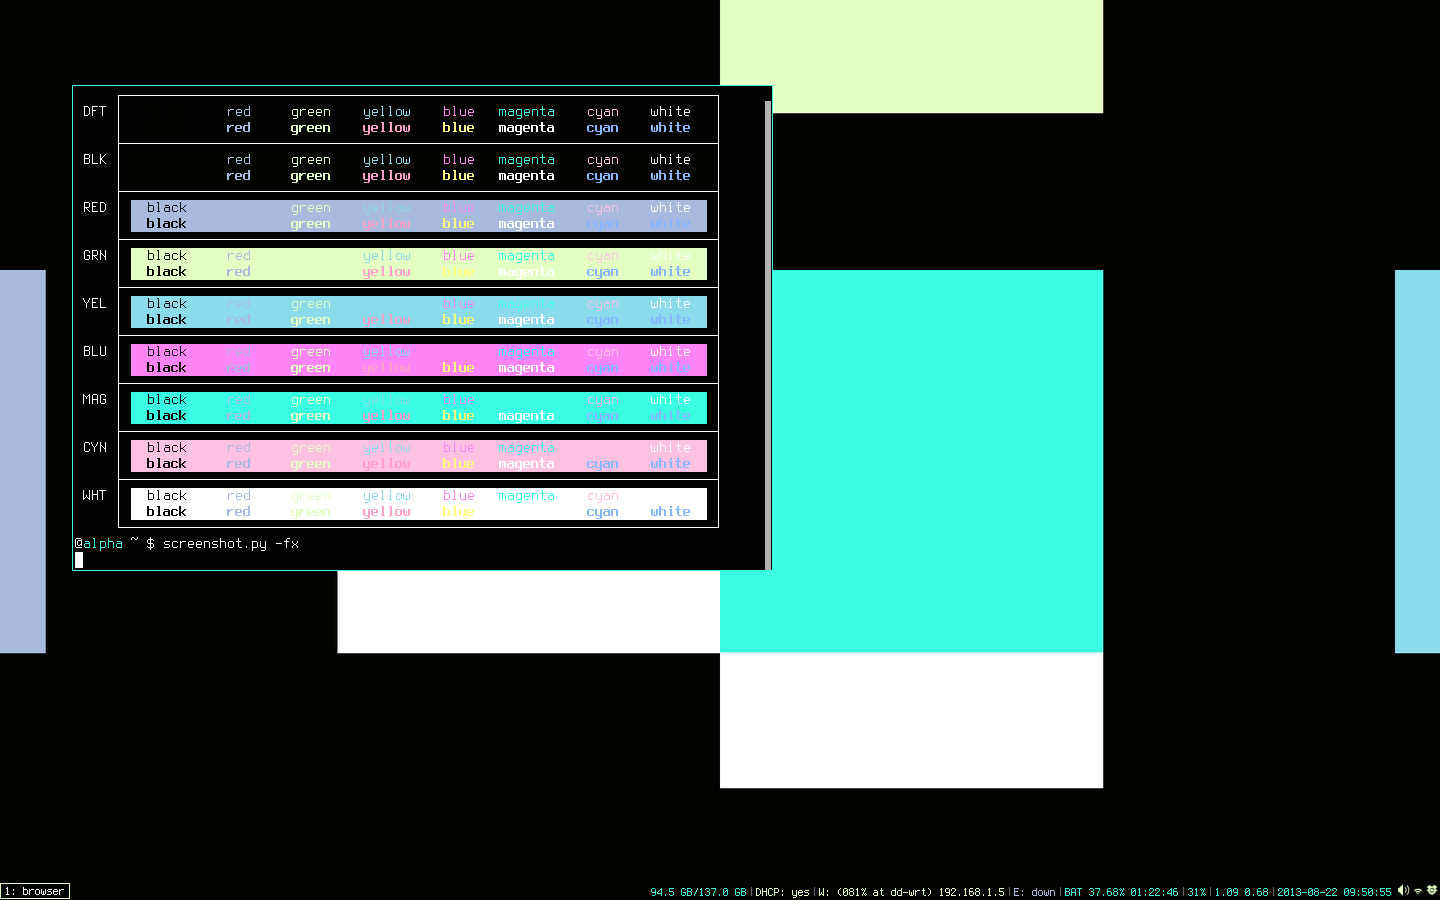
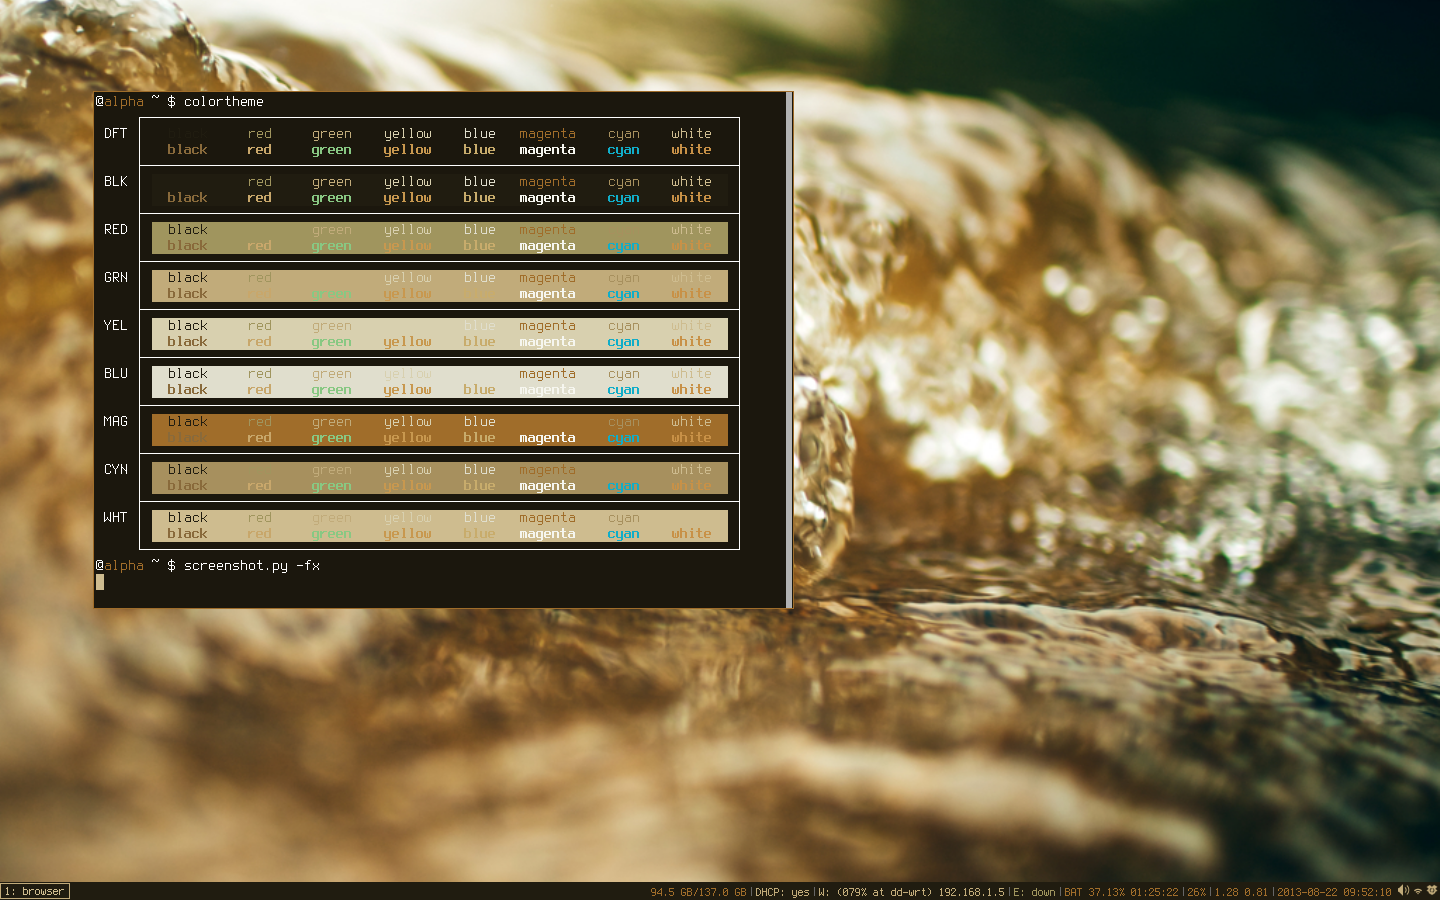
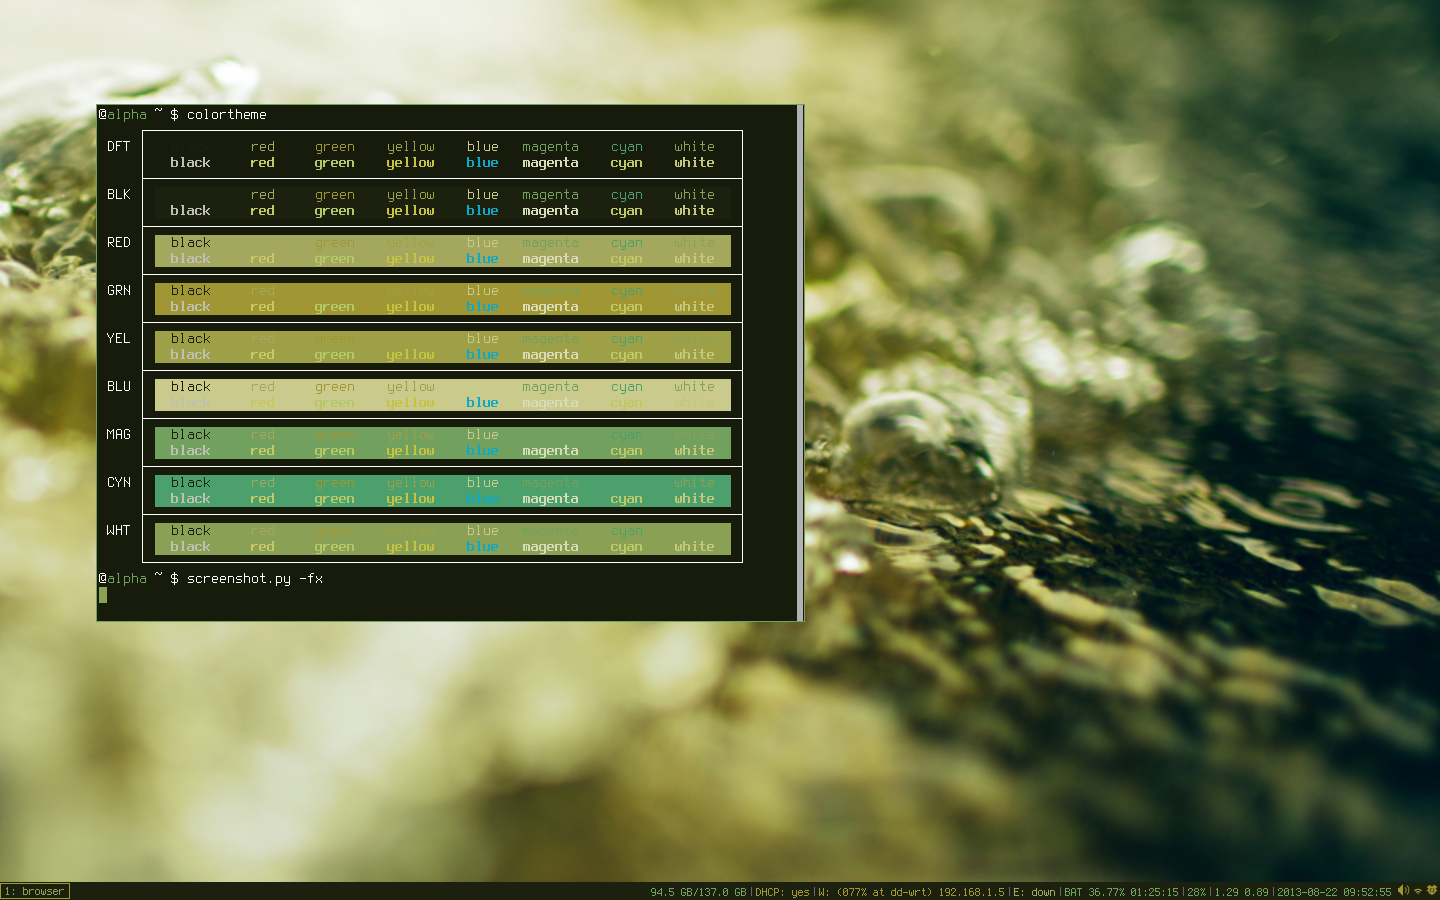
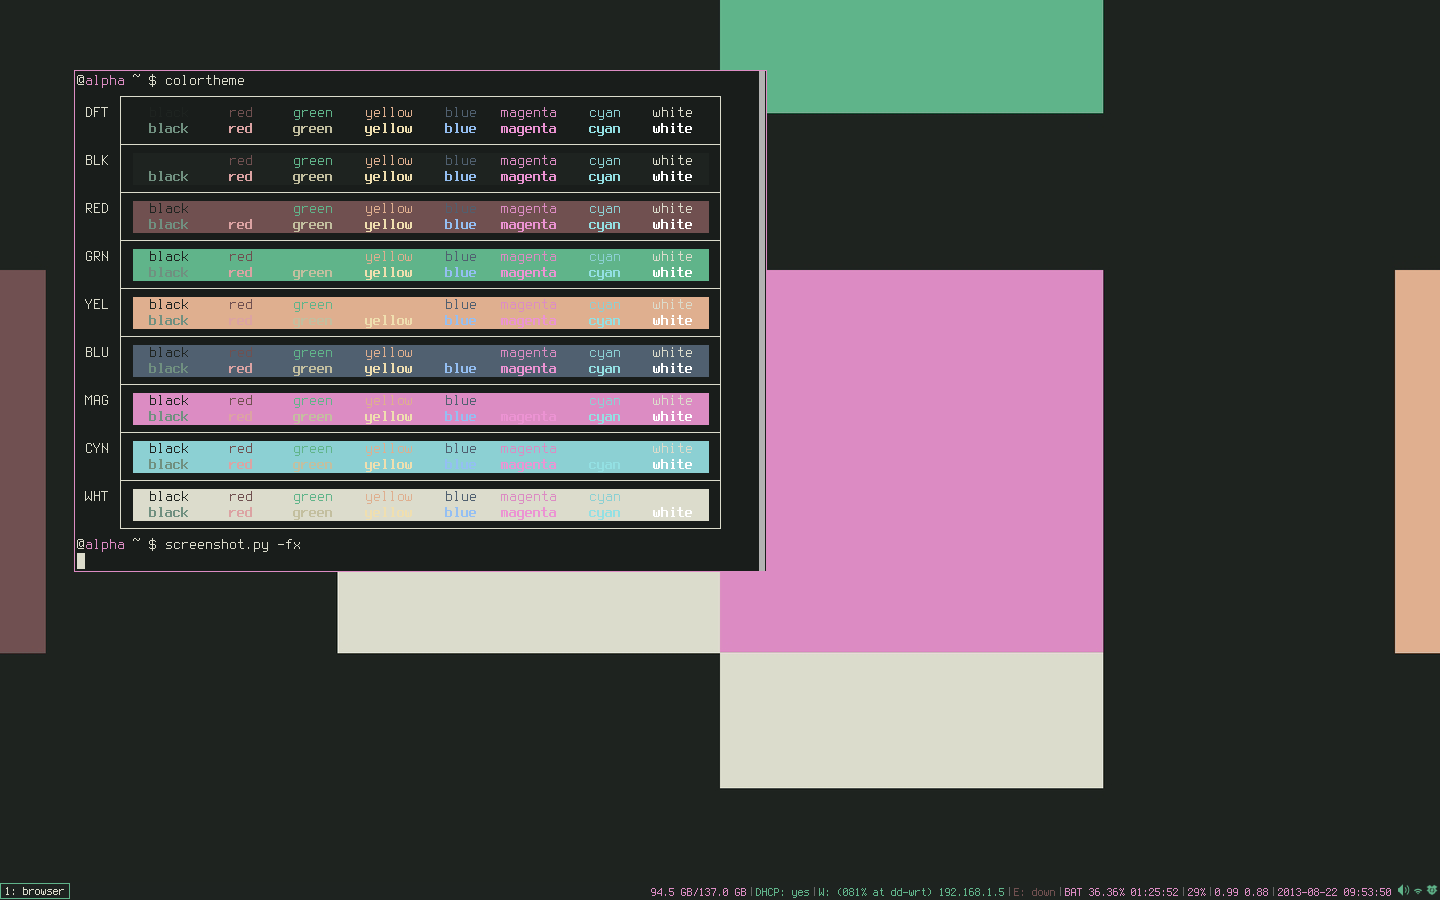
Below is a screenshot of my current desktop setup. I've made the windows transparent so you can see the wallpaper. The left-hand side shows the output of two scripts which show off my 16-color terminal colorscheme. The right-hand side shows where I spend most of my time, the text editor. At the bottom is a little ribbon that shows my active "virtual desktops", as well as some status info, a clock and my tray icons (sound volume, wifi, and dropbox).
I really like to freshen up my colorscheme every month or two, but as I'm particular about everything matching, it takes some time to do it right and I'm not always sure how it will turn out. I also like to save my themes so I can switch back to them, but since there are so many files that contribute to the appearance, it often was more trouble than it was worth to try and "save" them.
So I did what any programmer would do, I decided to write a script to make it really easy for me to change up my colorschemes.
Here are some links to some themes I've generated with my script. They have cheesy names, but it helps me remember which is which.
In case you're curious, I'm using i3, a "tiling" window manager. Unlike Windows or OS X, my windows are all placed flat and "tiled", and instead of stacking them I have multiple virtual desktops. Check out the screencast:
"themer" in action
The script itself is pretty easy to use, and hopefully very hackable if you're
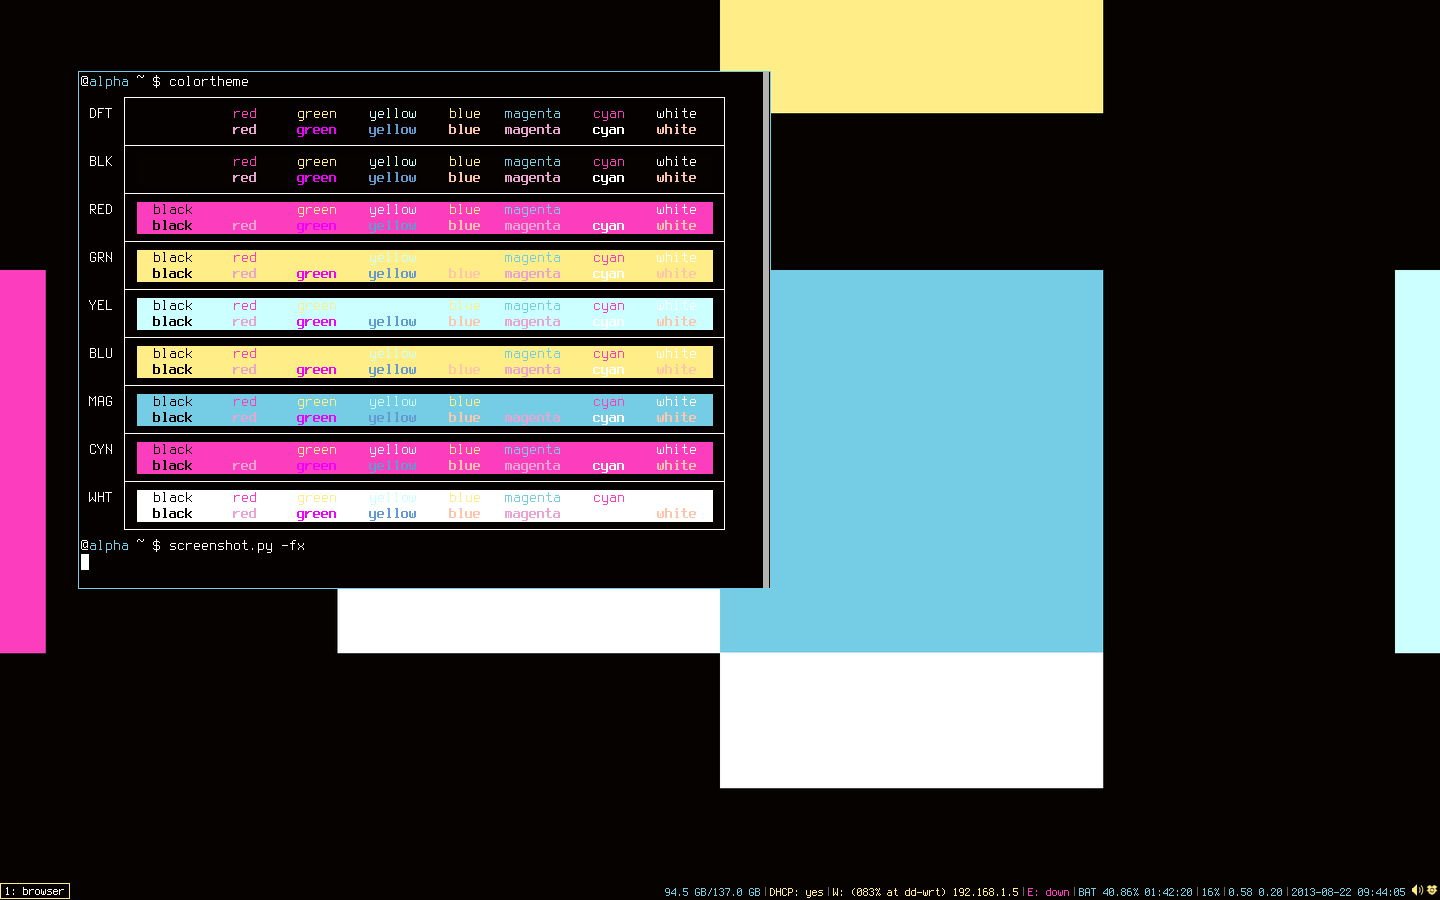
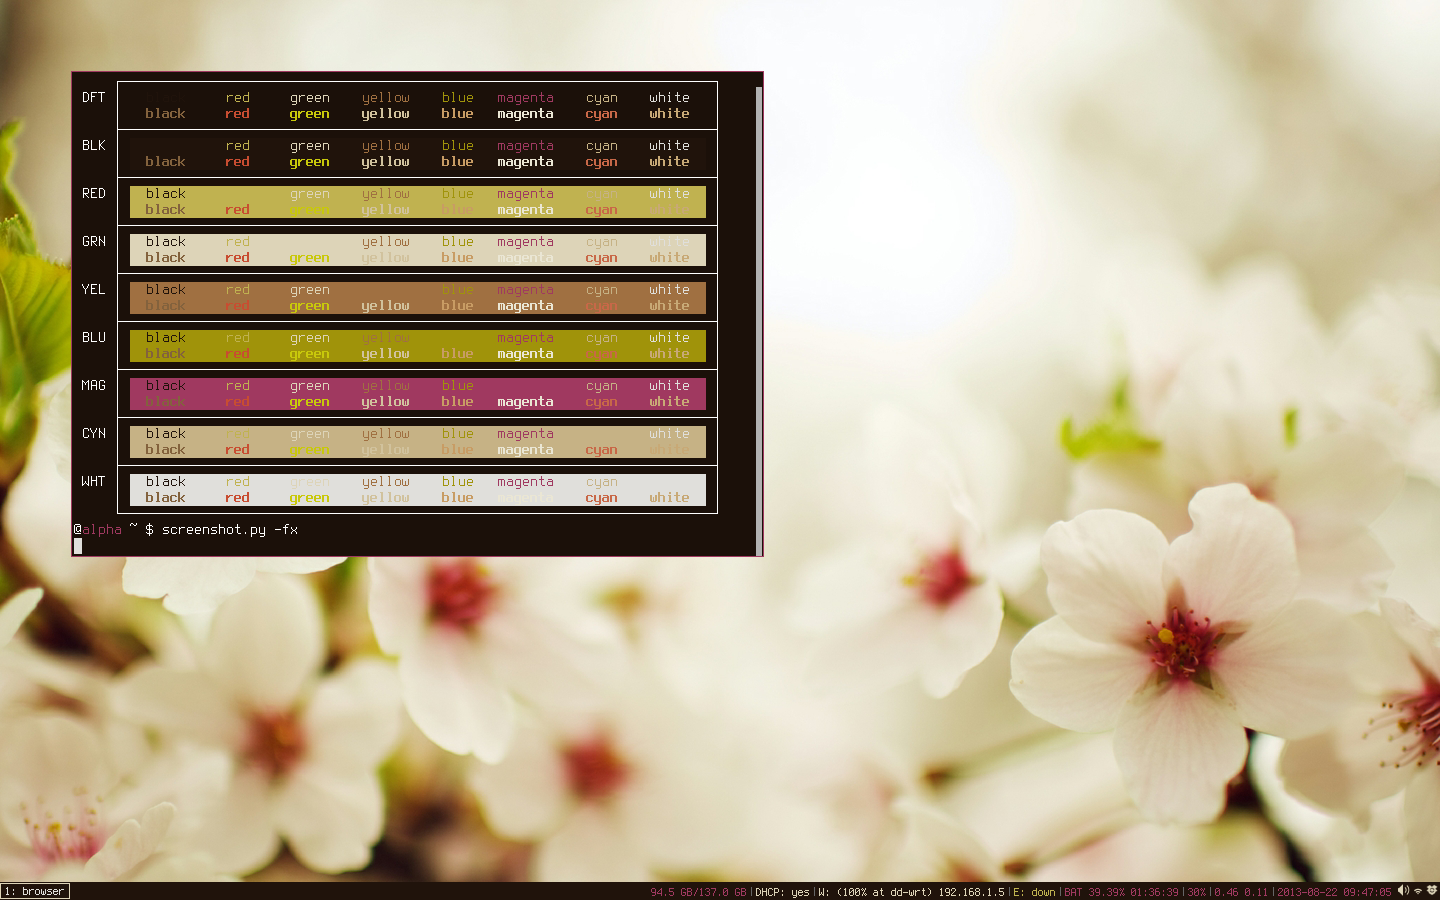
interested in tailoring it to your desktop. The screenshot below shows how I typically use themer.
themer listto list out all the themes I've currently gotthemer currentdisplays the name of my current theme and what the colors look likethemer generate bloom ~/pictures/Wallpapers/bloom.jpggenerates a new theme based on a nice wallpaper I found (wallpaper displayed in bottom-left).themer listagain to see that "bloom" was added- Then lastly I open up a browser and view the auto-generated "index.html" file which displays the new colorscheme as an HTML page.

The source code
The script itself is over 500 lines of (hacked together) code, too long to just slap into this blog post, so I've put it up on github as a gist:
https://gist.github.com/coleifer/33484bff21c34644dae1
I've also included some templates to get you started if you'd like to try it out
for yourself. These belong in the "default" template folder, ~/.themer/templates/i3/
(though of course you can change this to suit you). The templates and config
are in this gist:
https://gist.github.com/coleifer/9fbab2d19a337512ab2a
Additionally, the script relies on a helper I wrote called wallfix
which automatically resizes and crops an image to make it suitable for use as a
wallpaper. The cropped wallpaper is stored in $HOME/.wallpaper.[png|jpg].
A color for every occasion
Sometimes I would see a really cool colortheme on the unixporn subreddit (don't worry, its safe for work), so my initial plan was to be able to take the 16 color Xresources file and generate everything else from that.
A while ago I found a really cool site that will automatically generate color schemes for popular text editors. Sweyla's site let's you cycle through thousands of programmatically generated color themes by clicking a button -- it's pretty slick and some of the themes look great so I knew I wanted my script to also be able to use themes from Sweyla's site.
And finally, back when I wrote about using k-means to detect the dominant colors in images, a friendly redditor shared a script he wrote that will normalize the colors extracted from wallpaper images so he could generate Xresources files directly from his wallpaper. I borrowed his code for "normalizing" colors so my script could generate colorschemes directly from a wallpaper I liked.
So the script will accept three possible inputs:
- Xresources color definitions
- A set of colors from Sweyla's website
- An image file (which will also be the wallpaper)
The script is then responsible for updating my various config files. Here is the list of things I change whenever updating my colors:
- Xresources, the 16 colors I use on my terminal
- Window borders (i3 uses a simple text file to configure these)
- Status bar and program launcher (i3status and dmenu_run)
- Wallpaper
- Icons (I use ACYL, a customizable set of svg icons).
- Text editor
Setting things up
A long time ago a former coworker of mine wrote some utility scripts that used
a combination of python, YAML and Jinja2 to template out his various system config
files. I think this is brilliant and decided to go with the same combination for
my script. It reads a YAML file that defines variables controlling
things like the font, window borders, etc. The config file also defines the
locations of the templates for rendering my .Xresources, .i3/config, etc.
Here is what my main config currently looks like:
variables:
  primary: magenta
  secondary: green
  tertiary: red
  special: yellow
  transparency: 85
  fontName: terminus
  fontSize: 12
  font: "-*-terminus-*-*-*-*-12-*-*-*-*-*-*-*"
  window_style: 1pixel
files:
  colors.tpl: colors
  i3.tpl: i3.conf
  i3status.tpl: i3status.conf
  xresources.tpl: Xresources
  index.tpl: index.html
The variables section defines things that I may want to change later, such
as the font I use, or which colors I treat as primary or secondary. The
files section contains a mapping of template file to destination file. These
are just jinja templates -- here is a snippet from the xresources.tpl:
*faceName: {{ fontName.title() }}
*faceSize: {{ fontSize }}
*font: xft:{{ fontName.title() }}:{{ fontSize }}
*.cursorColor: {% if foreground %}{{ foreground }}{% else %}{{ white }}{% endif %}
As you can see, this template uses some variables defined in the variables
section of the YAML config file. It also uses one that isn't defined in the config: white.
Because the script will programmatically determine which colors to use, it will
be responsible for adding them to the template context.
Here is the code for reading the configuration files. It supports config-file inheritance, although I haven't yet found myself using this:
def dict_update(parent, child):
    """Recursively update parent dict with child dict."""
    for key, value in child.iteritems():
        if key in parent and isinstance(parent[key], dict):
            parent[key] = dict_update(parent[key], value)
        else:
            parent[key] = value
    return parent

def read_config(config_file):
    """Read a YAML config file."""
    logger.debug('Reading config file: %s' % config_file)
    config_dir = os.path.dirname(config_file)
    base_config = {}
    with open(config_file) as fh:
        data = yaml.load(fh)

    if data.get('extends'):
        parent_config = os.path.join(config_dir, data['extends'])
        base_config = read_config(parent_config)

    return dict_update(base_config, data)
By now I imagine you see how this all works -- so how does the script figure out which colors to use?
Getting the colors
As I mentioned earlier, the colors are read from one of three sources so I just needed a way to determine what to do given the input. It works like this:
- If the input is a bunch of numbers, consider it the "seed" for one of Sweyla's
themes, and use
urllib2to go fetch the colors and convert them into something usable. - If the input is a file and ends with ".jpg" or ".png" treat it as a wallpaper and use the k-means algorithm to extract 16 colors from the image file (and do a bit of normalization as well).
- Otherwise, treat the file as an Xresources-type file and simply parse it for the color definitions.
Each of these is implemented as a different ColorParser. For example, the
"Sweyla" color parser fetches the pygments color theme and then maps the values to
colors used by the templates:
class SweylaColorParser(ColorParser):
    def mapping(self):
        return {
            'bg': ['background', 'black', 'alt_black'],
            'fg': ['foreground', 'white'],
            'nf': 'red',  # name of function / method
            'nd': 'alt_red',  # decorator
            'nc': 'green',  # name of class
            'nt': 'alt_green', # ???
            'nb': 'yellow',  # e.g., "object" or "open"
            'c': 'alt_yellow',  # comments
            's': 'blue',  # string
            'mi': 'alt_blue',  # e.g., a number
            'k': 'magenta',  # e.g., "class"
            'o': 'alt_magenta', # operator, e.g "="
            'bp': 'cyan',  # e.g., "self" keyword
            'si': 'alt_cyan', # e.g. "%d"
            'se': 'alt_white',
            'support_function': 'underline'}

    def read(self):
        mapping = self.mapping()
        resp = urllib2.urlopen(
            'http://sweyla.com/themes/textfile/sweyla%s.txt' % self.color_file)
        contents = resp.read()
        for line in contents.splitlines():
            key, value = line.split(':\t')
            if key in mapping:
                colors = mapping[key]
                if not isinstance(colors, list):
                    colors = [colors]
                for color in colors:
                    self.colors[color] = value
        return self.colors
Another trick is to update the colors of the icons I use on my desktop. There's
an icon theme called "any color you like"
that consists of a bunch of svg icon files and a python script which lets
you modify the icon colors (so your folders/files could all be one color and your
programs another). These icons are really just fancy text files, so the script
will introspect the colors of the icons you're currently using and do a big
"search and replace" to swap the old colors with the new ones.
Putting it all together
As I hope I've shown, generating a new theme consists of little more than determining which colors to use and rendering a set of templated config files. The other important task the script does is make it easy to "activate" a theme once generated.
Here are all of the things that the script does when you activate a new theme:
- Put rendered templates into their own folder so I can have a collection of themes ready when I want to change it up.
- Symlink the active set of templates to a well-known location, so I can in
turn symlink the "active" templates to where my configuration files live. For
example
~/.themer/zenburn/is symlinked to~/.themer/current/and then~/.themer/current/Xresoucesis symlinked to~/.Xresources. - If a wallpaper wasn't specified, generate a geometric pattern using the colors from the theme.
- Set the wallpaper (using the wallfix script).
- Change the icon colors.
- Generate an HTML file "demoing" the colors so I can remember what they look like.
- Other junk like calling
xrdb -mergeand restarting my window manager.
I've had a ton of fun hacking this together and imagine I will continue to make tweaks over time. While the script and config files are fairly tied to my own setup, I hope that if you're interested, you are able to modify and expand on them.
Thanks for reading! Please feel free to leave any comments, questions or suggestions below.
Links
- The script: https://gist.github.com/coleifer/33484bff21c34644dae1
- Template "starter pack": https://gist.github.com/coleifer/9fbab2d19a337512ab2a
- Sweyla's theme generator: http://sweyla.com/themes/seed/693812/
- Using python and k-means to find dominant colors in images
- ACYL, the icons I use
- @radiosilence's color generator script
- r/unixporn - don't worry, it's safe for work
- Added 8/25 a helpful redditor reimplemented the kmeans in C and has put it on github.
Comments (5)
Charlie | aug 23 2013, at 09:55am
The script was written with python 2 in mind, as that is what I still use. You can fix this by calling the print function: print("\n".join(sorted(themes))). There are probably other places that will need to be updated as well, unfortunately.
Wann | aug 23 2013, at 07:43am
Hi, great work, but I'm keep getting this error when trying to run this script on Manjaro Linux with python 3.3:
File "themer.py", line 488
    print "\n".join(sorted(themes))
Charlie | aug 22 2013, at 04:21pm
I used xcompmgr for transparency in those screenshots, although I don't usually run a compositor.
Stephen Tanner | aug 22 2013, at 03:34pm
This is most good! I use i3 myself and am curious what compositor you are using for transparency?
Commenting has been closed.
Wann | aug 23 2013, at 01:13pm
Thanks! Works like a charm with python2 after installation of python2-yaml and python2-jinja modules.